

The SmallHD DP6 Monitor is the latest addition to my arsenal of gear and I posted some info on receiving it just over a week ago here and gave a run down on my first impressions. Those first impressions were good by the way! Anyway since then I have been playing with it a bit and I have to say I’m very happy. Pulling focus and monitoring the live video feed is so much easier and much more rewarding over the standard LCD screen of my 5DMKII.
Click the title to read more on how I mounted it to my Glidecam HD-4000….
Now it’s time to get this puppy mounted onto my Glidecam HD-4000 which is the other main reason I wanted this monitor. I operate a Merlin Steadicam Arm and Vest bundled with a Glidecam HD-4000 which is essentially a full steadicam rig. In terms of Steadicams this is at the baby end of the scale, but its still a serious peice of equipment and it still achieves amazing results. The main downside to this rig I guess is the limited weight it can support. It is not designed to carry a large camera combined with remote follow focus units and wireless transmitters and large battery packs and larger monitors…. all that stuff is out of the question.
Being a HDSLR user though, I can still get away with a few extras thanks to the small size and weight of the camera. The SmallHD DP6 is an excellent monitor solution for me, and the fact it doesn’t require cables or additional battery packs is a bonus.
Weighing in at only 373 grams (12 Oz) it doesn’t cause any weight problems. I have two LP-E6 (5DMKII batteries) batteries attached to the back which add a minor amount of weight but it still keeps my rig well under the maximum capacity.

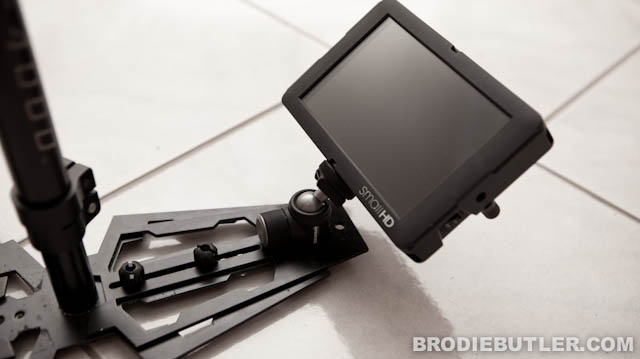
To connect my DP6, I used a Cullmann CB2.7 Mini Ball Head. This head is the smallest of the CB ballheads, weighing just 85 g (3 oz) with construction of anodized aluminum and it can support up to 1 kg (2.2 lbs). The cool part of this head is it has an adapter with 1/4″ camera screw but it also has a hot shoe mount to give you the opportunity to mount a flash or microphone etc. You simply just invert the adapter on top of the head.

The circular nob can be turned to loosen and tighten the ball head and its very smooth and feels like a quality piece of gear. The ball head moves in all directions as you’d expect and there is a slit on the far side so you can mount whatever it is your mounting, completely flat as shown below.

To connect the monitor to the camera I simply used a 1.5ft Mini-HDMI to HDMI cable which you have to carefully run up the Glidecam to make sure it won’t interfere with your filming. Some people have made modifications to allow the cable to travel inside the stem of the rig. I found the 1.5ft cable to be the perfect size.
Thanks to Ashley from Camera Electronic for pointing out this little ball head. I was originally going to purchase a Manfrotto Ball Head with a quick release plate which was obviously much larger, but I think I saved a good amount of weight by choosing this Cullmann.
[UPDATE]
 This is a small update for Henry who asked about the cable. The image below shows the cable running from the camera and then being attached to the stem of the glidecam. That little loop makes room for my hand and needs to be just big enough so that I can pan the camera around in both directions without it hitting my hand. Usually I will tape the cable down to the end of the cheese plate to hold it better in position too. In this image, the cable is sticking out too much. The only thing that changes for a DSLR, is the cable comes out on the other side. To stop the cable sticking out too much at the top, invest in a right angle (90 degree) HDMI port adapter.
I don’t need to mount a battery on the back of the glidecam for my monitor. Since I own multiple 5D cameras, I have plenty of 5D batteries. So I purchased the battery adapter from SmallHD that allows me to use the 5D batteries with the monitor. I can sit two of them on there and they snap in and out super fast. Not only that but the camera is so much more mobile/portable!


16 Comments
The easiest route for the cable is to run it from the front of the camera platform (top stage) down to the monitor. In a diagonal. It’s unlikely you’ll pan far enough for the cable to interfere with your operating.
Drilling holes in the post and feeding the cable down through it… There’s really no need 🙂
Awesome – how are you going with flying and the SmallHD DP6 – does it make it easier/better?
Yeah its much better. Much bigger screen, i can put the sunshade on it and see in the daytime. its great. Its also useful when im on skates because by looking down at the monitor, i can see where im going in my peripheral better.
I was wondering if mounting a monitor at the base, how do you ensure the geometry and the weights on the front side(monitor) and back side (weight plates) is not going to be the same. I am a little puzzled, I so want to mount a monitor on my HD4000 and love the setup you have.. but is it going to be a nightmare to balance or I am over thinking here about the geometry ?
Also did you glue the cb2 to the HD4000 base ?
thanks
Harry
I’m not sure what you’re having trouble with exactly. There are more than enough weights provided with the Glidecams to counter balance the monitor on the front. Fortunately the monitor isn’t very heavy. Then to fine tune the balance, you can slide the part that hold the weights in and out.
I do have a bit more weight up top where the camera is. I usually shoot with a mattebox and rails and I use a 16-35mm or 24-70 mm lens which are heavier pro lenses. (as opposed to perhaps tiny little nifty 50 lenses or something lighter weight). Dont forget those little screw nobs up top and for fine adjustments. they move the glidecam left-to-right and front-to-back in small increments for fine tuning.
I get a lot of questions about balancing but to be honest i cant work out why people have so much trouble with it. maybe i’ll try find time to make a video.
Thank you! I’ve been trying to find a suitable mount to attach my Lilliput 7 inch monitor to my Glidecam XR 2000. The Cullman CB2 solves the problem. This little mount is so well crafted, and a great price too.
However, I’ve been having trouble with the weight of my Lilliput. I know you’ve said there are ample counterweights, but I’m using a 550D with a Tokina 11-16mm lens and the this combined weight on top doesn’t finely balance with the counteracted weights on the bottom alongside the monitor. I’ve even tried adding spare counterweights to the top plate, but I just couldn’t get it balanced. In the end I’ve put the monitor onto my shoulder rig instead, and I’ll just use the LCD screen on the camera. It’ll be fully open anyway, so no real focus issues.
I might try the set-up again. When my patience returns 😉
hi Brodie,
excellent article! i know it’s been over a year after your post, but could you share with us how you balanced and wired your connections? i’ve seen some users mount the batteries to the back end of the sled.. just wondering which way worked best for you!
Cheers!
Henry,
Its hard to explain so I updated the post with a new picture. See the bottom of the post!
Thanks for the update Brodie!! Your blog is awesome, please keep up the sweet sweet work =D
Henry from Vancouver BC
What did you use to attach the Cullmann CB2.7 Mini to the Glidecam plate? I have the exact setup but not sure if you just bought a bolt from the hardware store or something special. Thanks.
I simply used a little bolt with a screwdriver head with the same thread. It was a tad too long so I put a washer or two in there to make it nice and tight.
THANK YOUUUUU!!! I searched for so damn long to find this setup, hard to believe huh? So it IS possible! I googled everything under the sun, and finally went to images, and yours was the only one. So you fly just fine with this rig?
Fly just fine. I also fly fine with a stripped RED camera:
https://www.brodiebutler.com//////red-scarlett-camera-on-glidecam-hd400-with-steadicam-merlin-vest/
Here’s some more pictures of the DSLR in action:
https://www.brodiebutler.com//////behind-the-scenes-filming-jack-perejuans-single-shot-music-video/
Hello. I would like to emulate your configuration, but I can’t quite make out how you made it work with just an 18-inch HDMI cable. I’m trying to fly a Canon 5D Mk III on an HD-400 and connect to an Aputure VS-1 7-inch monitor, I can’t see how it can be done with a cable less than 24 inches in length.
Thanks.
– Scott
Well it’s quite simple I’m not sure where your issue is. You can see it in the image in this post.
There might be alternative images that help you on these posts:
https://www.brodiebutler.com//////behind-the-scenes-filming-jack-perejuans-single-shot-music-video/
https://www.brodiebutler.com//////red-scarlett-camera-on-glidecam-hd400-with-steadicam-merlin-vest/
If you need to just use a longer cable and tie up and loose cable with some tape. Easy done!
Thanks for your reply. You’re right, the path of the cable is quite clearly shown in your photos. The trouble I’m having is figuring how that particular path is possible with a single 18-inch cable. On my HD-4000, the vertical distance from the bottom of the base plate to the bottom of the center post (fully collapsed) is 19 inches all by itself.
In any event, as you suggest, any reasonable length cable will do, with appropriate measures taken to tie it down to prevent the possibility of it catching on anything. But I was hoping to find a nice short cable that would require only minimal management, and there seems to be a void in the market for cables greater than 18 inches and less than 6 feet/2 meters. Anyway, I’ll figure it out.
Thanks for the inspiration!
– Scott