

Backing up your images and data is such an important aspect of Photography and I don’t believe it gets enough attention. I can’t emphasise the importance of it enough. Every single year I see horror stories posted on social media from people losing their work due to hard drive failure, or stolen laptops or whatever the case may be. To be honest, I don’t feel bad for them one bit. They failed to do one simple critical task; Backup.
I spent a lot of time searching the internet to try find workflow and backup solutions that would be suitable for me. Most of the solutions I found however seemed to be on a much smaller scale or a much larger scale than what I needed but they still offered some great insight. I finally put together a solution that works for me and this setup has evolved over the past ten years to what you see in this post. I will continue to improve it and tinker with it as time goes on.
In my research, I found that it was always interesting and helpful to see what other people were doing, so I thought people could potentially benefit from me sharing my setup and backup solution. So in this post I’m going to give you a look at my backup solution. To give you some context of scale, I am a full-time professional, freelance photographer that works from a home office. I have been shooting since 2004 so I take up quite a lot of space.
THE SETUP
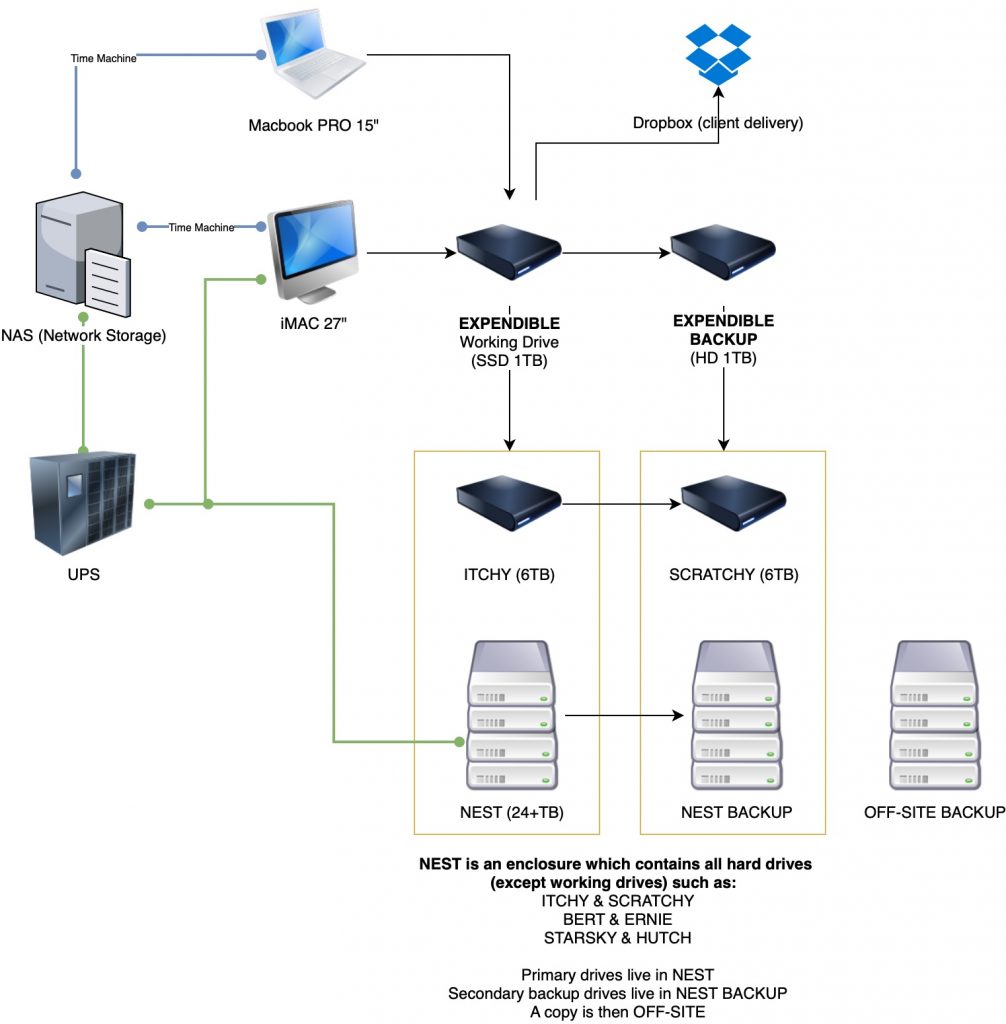
Here is a diagram that outlines the structure of my backup environment. I explain the setup in detail below.
The Machine

 So I’m a MAC user. I converted back in 2009 never looked back. I have always run a 27″ iMac, with maxed out RAM and an SSD installed. My main working machine as of 2020 is a 5K Retina iMac 27″ with 64gb of RAM and a 500GB internal SSD.
My internal hard drive is strictly just for the operating system and applications. I try to avoid storing anything on there. It makes all my applications load super fast and turning the machine on and off happens in just a few seconds. My machine itself is backed up to a Network Area Storage (NAS) device using Time Machine. All my images and video is kept seperate below.
EXPENDABLE Working Drive (1TB SSD)
 Expendible is a Solid State hard drive that is where all my current open projects live. Anything I am currently working on needs to be on this drive. When I import a new shoot it goes straight onto this drive. If I need to work on an old project, I move it to this drive first. The short delay in moving files means a nice seamless workflow once I get started on the actual work.
Personally I use a Samsung T5 SSD USB3.1 in 1TB. It comes in all different sizes up to 2TB. They are brilliant and fast. They are also incredibly small and portable which makes them perfect for travel. This is the drive I take with me if I need to travel, and it means I still have all my current projects with me. Anything additional I want to take I just transfer it to this drive first, and make sure there is a copy. When I refer to travel it includes on-location jobs where I may need to tether to a computer, or jobs in another city/state/country.
EXPENDABLE Backup Drive (1TB HD)
 My Solid State working drive for current projects (Expendable) is backed up frequently to this drive to make sure I have all my current work safe and secure. Since this is a backup drive only, it is not a Solid State Drive.
When travelling I will often keep a backup of all new work on my actual Macbook Pro. If there is quality internet I will use my Dropbox account as a secondary measure too, but using cloud services is always a last resort for me. If the work I am travelling for is really important commercial work, I will often take a second T5 SSD drive to make sure I have a backup, and I have even shipped hard drives back home to myself just incase so they travel separately. Once I return home, all the new work will be backed up to this drive.
Travel Note: To keep as many backups as possible I always take extra memory cards when travelling. The idea is that I don’t shoot on the same card the whole time. I try to use up as many different cards as I can to ensure I have another backup. When I import images to my Macbook Pro I don’t format the CF/SD Cards. The images will remain on the cards until such time that I run out of cards and I need to use one again. Just a little bonus which has saved me before!
This drive also serves as my scratch disk for photoshop and various other applications such as Final Cut Pro X. This is the drive the system will use once I max out my memory and the system uses it to write cache data. This is a well known and recommended method to increase performance, plus it keeps my internal SSD nice and clean.
ITCHY & SCRATHCY (6TB HD)
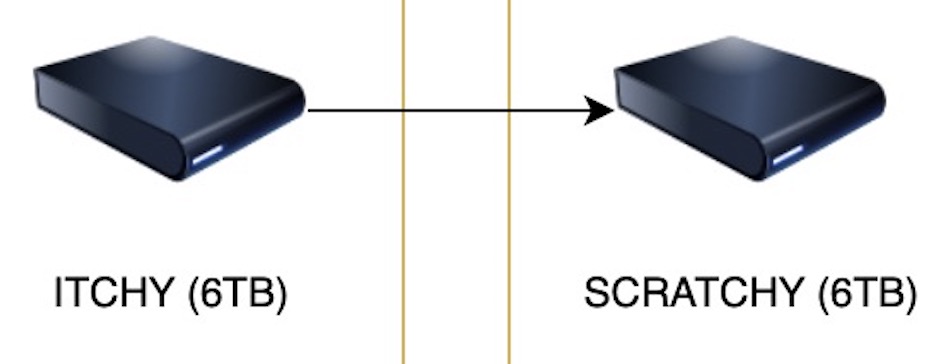 Itchy is my primary drive which contains all my recent work except for the jobs I am currently working on. As soon as a job is finished on Expendable, it gets moved to this drive. Anything that is on this drive is then backed up to a second local location called Scratchy. So Itchy and Scratchy are identical copies of each other. They are not in any RAID configuration.
This drive also contains things like my business documents, logos, workshops, invoices and everything else to do with my business that isn’t speed critical or isn’t needed to be accessed frequently.
BERT & ERNIE
Bert and Ernie are just older versions of Itchy & Scratchy. Every couple of years or so when my storage drives become full, I will buy two new drives and give them new names. The first drive being the primary drive which is used to access images and data, and the second drive is just the backup. I put all these drives into Hard Drive Array enclosures without any RAID.
NEST
Nest is just a name I have given to my hard drive enclosure that keeps the Itchy, Scratchy, Bert and Ernie hard drives. All hard drives are independent and there is no RAID.
NETWORK STORAGE


For Network Storage I have a QNAP 4 bay NAS (TS410) with 4 x 3TB Western Digital Caviar Red hard drives giving me just shy of 9TB of space in a RAID 5 configuration. I have currently filled almost all of that.
I have set it up in RAID 5 because redundancy is more important to me. What that means is if a hard drive fails, I can simply replace it and no data will be lost. While I am one drive down, I can still access my data. Mind you, if a drive does go down, it will take anywhere up to 48 hours to actually rebuild the RAID. While you can still access your data in that time, it is incredibly slow and it is a real pain.
I rarely access this server. It contains all my Time Machine backups for my iMac and Macbook Pro, some media such as music and movies, and a backup of a lot of my old work dating back to 2004. I wouldn’t neccesarily recommend a NAS. Eventhough this is a very old unit (10+yrs) I am still not really a big fan. It offers a lot of features but the only feature I use is the Time Machine backups. To me it’s just a RAID array, and I don’t even like RAID. So in the future I think I will move to a simple hard drive array and get rid of this thing. A NAS might serve your purposes better, you will have to research that yourself.
Off Site Backup
You can have a handful of backups in your office which is great, but what if the place burns down? Off site backups are so critical it’s not funny. Personally I am against using any sort of Cloud service. Not only are they completely unviable for working professionals but I just don’t trust them. My machine would be uploading constantly 24/7 if I had to backup to a cloud service, and I don’t want to waste all those resources and bandwidth on that. It’s also plausible you could get locked out, or for the service to be hacked. I think they have all been hacked at some point. At the end of the day it’s just someone else’s computer your sending it to. I like to have complete control and security of my own work, especially when you have a lot of sensitive material on there!
So every second month or so, everything that I have locally is backed up to additional drives and sent to a top secret location and put in a safe. I probably don’t update them as much as I should but at least I can sleep knowing I wont lose my entire careers work.
Be careful with fireproof safes, because they can’t all protect electronics. Most cheaper firesafes will only stop things like documents lighting up, but the inside of a safe will still get extremely hot and usually hot enough to ruin electronics. So just be wary of that, and look towards the higher end of fireproof safes if you wish to store something like hard drives. In fact mine is not a fireproof safe but I have chosen to run that risk. It would be very unlikely both locations will go up in flames at once.
RSYNC
Rsync is a command line utility that is very clever and VERY efficient at not just transferring files but synchronising them as well. I use Rsync to handle all my backups. I use it to synchronise my primary drive to my backup so both drives are always identical. If you delete files on your primary drive, it can also be setup to delete them from the backup as well. This way your backup drive doesn’t fill up with files you don’t want. It can also be set to ignore certain files or folders, and it will update files that have since changed since the last time it was run.
It does all this much faster than any Copy and Paste ever will. A LOT faster.
I personally created a lot of Automator workflows to run the Rsync command to backup all my paired drives. I place these workflows in the Apple Scripts folder (user/Library/Scripts) and I run them manually as I need to from the taskbar menu. How do I run from the task bar menu? It is possible to set them up to run automatically but I’ve never bothered to do so as it’s second nature to me and I like keeping an eye on things to make sure it works smoothly. If this freaks you out there is also apps out there that can use this utility giving you a graphical user interface.
There is a lot of information out there on rsync but I would say you need to be a little bit technical to understand what’s going on. If you’re not a computer person this may not be for you.
Backup Backup Backup
Believe me, there is no worse feeling than having a hard drive fail with important data on it. It’s the most horrible gut wrenching feeling. I have experienced this feeling once before and once was enough. Fortunately for me, I didn’t lose any critical data or any of my work. It was simply a months worth of happy snaps from a holiday in America. In the end I was actually able to recover most of it all back so I was very lucky, but there was a couple of weeks there where I thought all was lost. So please backup your data!
Well I think that’s pretty much it. If you have any questions drop them in a comment!
I’d love to hear your solutions and ideas in this area so drop us a comment!
B.


3 Comments
One comment on downloading. I find that Adobe Lightroom is ssssslllllllooooooooooooooooow to download, let alone the previews. So for the last 4 years I have used https://store.camerabits.com/products/photo-mechanic-version-5 program called Photo Mechanic. It’s available for both Mac and Windows. Absolutely lightning fast to set up and download. yes it will download to two locations at once. No you don’t have to wait for the download to finish before commencing to select your keepers (better than deleting the loses as it is a positive frame of mind approach).
You can tag your files up to 5 levels (I only ever use 3 (3 – keepers 2-maybes 1-garbage. If have sequences or the like i will use 4 for those.
You can use Photo Mechanic as a database for your files if you desire.
Best $150 (USD) I’ve spent.
The other item that is worth looking at is in the back-up arena. http://www.drobo.com is the a completely different system called DROBO. Again worth looking at and comparing with NAS systems.
For what it’s worth.
Love coming back to your blog, Brodie.
David Akesson
Yeah Photo mechanic is built for speed. It’s what all the professional sports photographers use. They need to get the images to the press instantly. Speed isn’t so much of a concern to the work I do. I currently prefer the functionality of Lightroom. So i wear that cost.
Drobo I would not advise. I did a lot of research and i’m glad i didnt choose it. It was always something people were skeptical about and now that its been out in the industry for long enough people are now realising and moving away from it as quickly as possible.
But for those reading, do your own in-depth research, and buy what you feel suits you best!
B.
Thanks. I went with a Synology DS 1515 backup NAS, first set up price can be huge. I spent over $1400 to get the right backup system. BackBlaze my online backup solution.
Just depends on how valuable your photos or data is. Least cost now is maybe only replacing drives if they fail and the odd subscription plan for online storage.
My backup solution was similar to this one here I can now sleep at night.
Cant wait for SSD to get cheap and high capacity. One day bring it on.
Dont forget 3 copies, 1 at home, one at a friends and 1 online copy.